Retopology
When taking my model into Maya, my workflow from working in Zbrush had little clean, quaded topology, so retopology would need to be quite manual and tedious. If I put the work into creating subdivisions in Zbrush, or I would do all cleanup in Maya, at some point in the pipeline I would require clean topology, and on evaluation I think I could have done more to save myself some work in the pipeline later. I personally don't mind taking the time to use quad draw, so I leave optimization towards the latter half of my project.
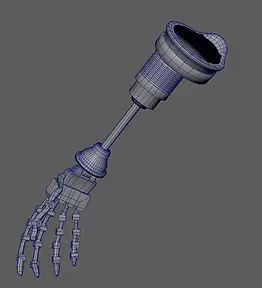

These models are 2 such cases - the topology of the models are mostly clean and usable - however because I modelled the first in Maya without subdivisions I now manually need to remove a lot of edge loops. As for the hip straps, I also had to remove a lot of edgeloops and edgerings too, even if I just worked with a subdivision or two I could have saved the work. As to why I didn't, I'd call it lack of hindsight and planning -- I was rushing through Zbrush with little consideration for the following processes. I was doing that because of time pressure, struggling under stress.


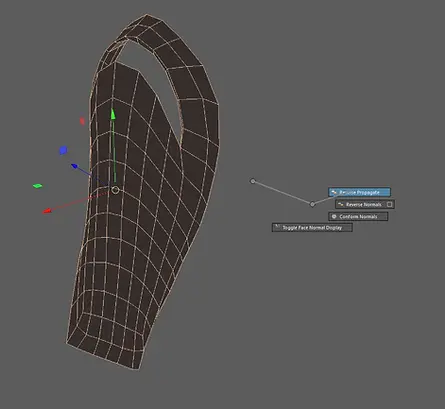
Other pieces of the arm required manual quad-drawing. My approach to qaud-draw is to draw loops around key structural shapes, like around the edges, the hole in the middle, stuff like that. Then, with those shapes supported, it's a matter of filling in the blank space.
In the case of this mesh, I saved myself a little time by selecting all the faces and extruding inward to add thickness. I did need to correct which way the faces are rendering, but the mesh display shortcuts make that quick work. The shortcut is SHIFT + RMB > FACE NORMALS and then either CONFORM NORMALS or REVERSE PROPAGATE

The rest of the major shells used the same quad draw technique as depicted above. Slowly I used that technique to gradually build up the model until the shape matches the highpoly. Although, to save a little extra time, I took the finger joints and duplicated and repositioned them a bunch to save remodelling each one.


When using quad-draw on the face, I was sure to be extremely pedantic with clean edge flow. The jaw had its own loop that circled up and circled up the head. The ear forms a curve (although simplified, It's just there to cast a silhouette/shadow if the viewer looked too close into the cracked mask. The importance of multiple loops around the eyes are twofold. Firstly, a lot of deformation is focused around that zone in terms of animation principles -- squinting, scowling, etc -- but moreover those regions have more complex, dense shapes compared to, say, the back of his head. Supporting the shapes require more geometry. So, making loops around the eyes/mouth/nose lets me add multiple loops only where they're needed, so they don't spiral back around to less needed areas -- again I don't need the extra geometry around the back, especially with the helmet.

As such, the back of the head is comparably sparse in detail.


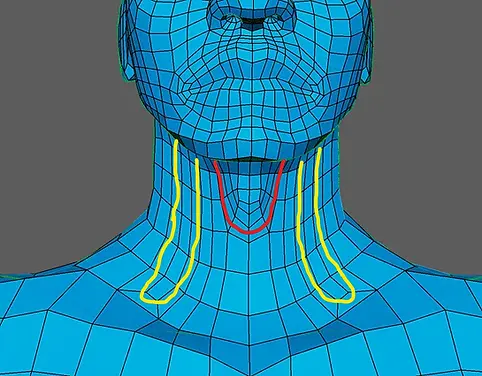
Now the head has its detail, I had to immediately reduce detail, as that level of geometric density was going to balloon my mesh detail where it didn't need it.
I had a hard time deciding where the detail could be reduced. I had the centre of the neck where it loops back in on itself, but I still needed it lower. Since the neck was obscured by the chestpate I decided to make the regions spiral back into itself (the loops marked in yellow).
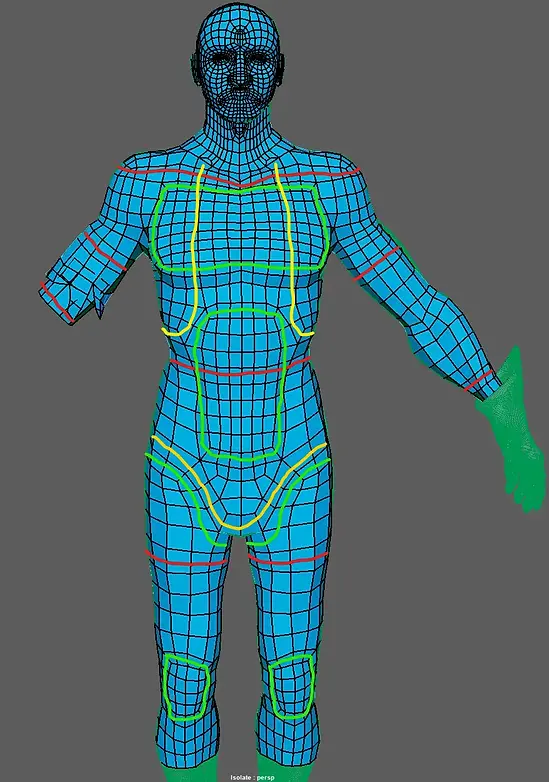
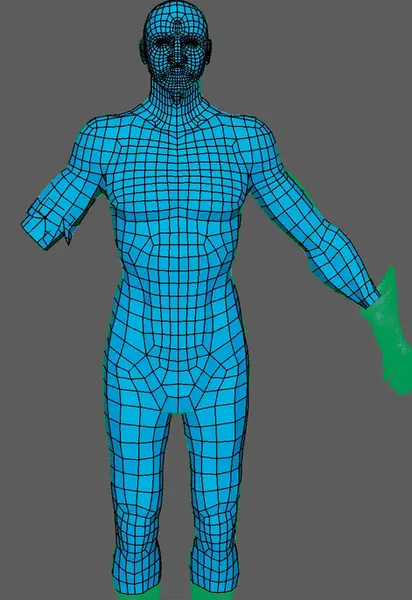
I had a lot of decisions to make when going about retopolizing the body. Since a lot of objects were borderline flush with the base of the figure -- it leads me to think "should I group these and retopologize these as one waterproof mesh?" or "Should these be separate objects?". I deliberately made the sleeves tiny so they only pull away from the figure where they're torn, so I concluded they should be retopo'd together. I considered whether the armour chest piece should be part of it, but I decided against it since it sits on top of the figure more than it intersects it, so if the edges were welded I thought it would lead to baking errors. As for the fingerless gloves though, I chose to make them part of the mesh since they tightly follow the palms and the hands, and only deviate towards the wrist.
While I could have also added the straps onto the mesh, the fact they're slanted made it harder to justify, it would mess up the edge flow around the legs and knees, so I kept them separate. Those components are also the few I didn't need to quad draw, so redoing and joining them were a waste of effort in my view.
As for the actual topology, I tried to make them follow the contours more than my prior works. I found that the green loops around the chest and around the stomach kept their contours sharp, since the loops themselves followed the edges. I did my best to otherwise keep everything evenly spaced while explicitly avoiding spiralling topology. Spiralling topology used incorrectly makes deleting edges extremely difficult, while also making deformation messier. I added addition loops around the knees, as they're a prominent point of deformation (marked by the green lines).

Same principle on the backside. I added contours along the curve of the back to hold the shape along his shoulder blades and hips. I added another loop around the elbow for the deformation, just like the knee.


I decided to model the glove separately flow now -- I intend to make it at least airtight later if not merged with the base.
About my decisions, I followed general guides for hand topology and applied the same kind of shape here. The focus was to make the fingers detailed as possible while reducing around the palm -- the same principle of trying to keep detail only where it's needed to keep the silhouette. I believe I succeeded quite well in this respect. I also added circular loops around the knuckles so they would bend more cleanly.

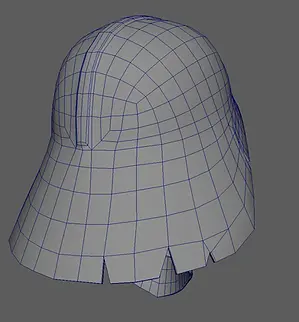


The helmet edgeflow was relatively straight forward at first. I had to take it a component at a time, concentrating on building out the flow of the edges before filling in the blanks.
Where it took a deviation for something more difficult is, naturally, the deep gash in the helmet. Up until this point I was working patiently using symmetry tools building the mask on the unbroken side. In order to actually address the deep gash, I took the knife tool and began tracing the hole along its edges, which gave me an approximate shape to begin deleting away.
It was a bit harder than that though; it had the shape, but polygon spacing was uneven, too dense in places. Some elements needed merging, some parts are turned into triangles (where I deemed appropriate, careful to make sure the shading isn't too messy). Around the cheek, I actually needed to redirect the edge flow a little, too.
Finally, when the shape was good enough, I took the front half of the mask, as well as the helmet, and extruded inward for thickness. I didn't give the back half thickness on account of the figure's head blocking that view entirely.


As the high-poly boots are modelled in pieces, I opted to model the low-poly in pieces too, as it retained the sharpness of the edges a little better. Moreover, it was easier to model this way, as not needing to make sure edgeloops continued from one piece to the next make it easier to keep detail preserved where I want it without building support loops where they're not needed.
As you can see, I used triangles to cut through the model diagonally. In recent research and testing I've done, I've discovered deformation is fine with triangles, granted you make sure there is at least a base of evenly spaced rows quads supporting it. Subsequently, slicing along them diagonally hardly affect that kind of deformation. To illustrate, take the above figure as an example. I used soft select to bend the boots, and it bent fairly smoothly since it has those foundational edge loops as I call them. The only downside is the uneven shading, but hopefully it's fixed with the baking process.
Lastly, for the laces, I took the mesh from the highpoly and just started cutting away at every other edgeloops to achieve the result.

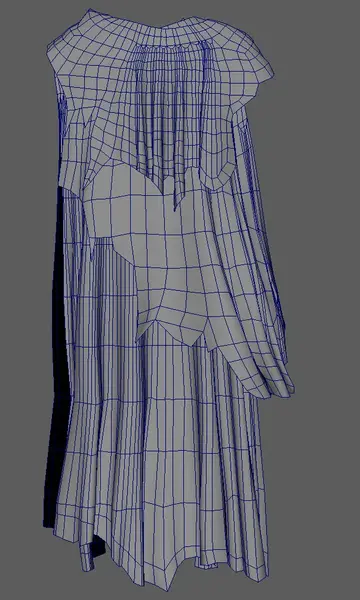

I'll be honest, using quad draw to manually retopolize the cape was a night, and I had to do 3 times. I would call my method likely misguided, as doing this manually took me 2 entire workdays to finish. No special techniques were used, I was just marking edges with loops and drawing polygons, and I tried to reduce it where I could. Im not a fan of how dense these meshes got, but I'm not entirely sure if it could have been helped with this method.
I tried using Zbrush to remesh the object, but Zremesher was giving really disappointing results, even after I masked loops around the edges I kept losing detail every time. Either in future I need to make the curves pinch a lot less, or I need to study a better way to retopologize if I ever do capes in the future.
The last piece was now the armour, the shoulder pauldrons and chestplate. For the trim around the pauldrons I attempted to use a shrink wrap modifier to attempt to wrap a cylinder around it, but this was either the wrong deformer, or I was doing it wrong. I took so long, I decided to cut my losses and just do it by hand -- building a cylindrical shape around one piece before dragging whole polyloops around one at a time. This workflow was inefficient, but I couldn't find a better trick for this. If I used subdiv in Zbrush I could have skipped this, but it was a bit late now.
Everything in the figure I used quad-draw, manually drawing all the loops. I got a good result, but the cost was my time.

Wrapping up retopology I was getting really near to 50k triangles, so I chose to do a few last minute optimizations. As I was going to use double-sided materials to keep the triangle cost down, I decided that I should remove thickness around the hand too; the rational being that the element was already so thin, making it double-sided was already a minimal loss in this area.
Key take away I was finished, and the polycount wasn't too insane - 48,556 triangles (if you triangulate the model) or 24.7k faces. It's roughly as high as hero assets in modern video games, so I believe this to be acceptable for my portfolio.

