Armour, Clothing & Accessories

The dome began as a sphere I masked and cut into a half-sphere.
I decided that I would use hard surface modelling from the offset of this component, primarily using zmodeler, poly groups and masking. I thought poly modelling would be ideal here, as a clean topological base keeps the shading clean and smooth. The helmet here is going to be very shiny, so even, smooth topology is necessary to avoid lumps and blemishes.
A title goes here. Click to edit and add your own.


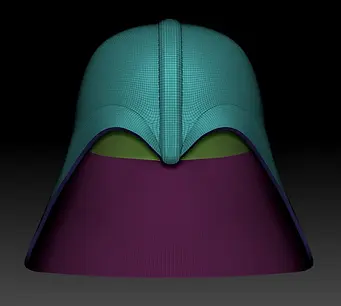
To create the sharp edge in the centre I started off slightly messy. I used the dam standard to draw in the edge, so its not super precise off the bat. But after I got that shape, I masked the major edge and made a different polygroup so I could polish it later. I used a rectangle mask to mask off the centre before turning that to a polygroup to extrude out the middle edge. When I had the rough, I used zremesher with groups on to make the topology follow the flow of the edges I drew on the model.

With a final bit of cleanup, I used the deformation tab. The key options I used were polish by groups and polish by hard edges. I just learned that if you hit the circle button on the right side of the slides, it inverts the deformation effect. If polish by groups smooths out poly group boarders, hitting the button did the inverse and sharpen them.
The last step was to add thickness. I used Zmodeler and hit polygon face > extrude > extrude all polygons. Frustratingly, the extruded layer didn't have my polygroups, but as the model was already refined enough I didn't need to spend my time regrouping them.

Scrapped Helmet
My first attempt at sculpting the mask went so poorly that I had to restart it. I believe I used the wrong approach, let's explore that. I started off with a sphere, using dynamesh, clay build up and, masking and move tools to get a basic shape.
Except that didn't work. I had my references gathered at the start of the project, Vader's mask from multiple angles, without the dome helmet, everything. I thought I could just push and pull the model until it would fall into place, and it just didn't work; the shape is deceptively complex. The cheekbones I had a hard time recreating, and I realized is that it doesn't follow the contours of the face. Moreover the scale of the helmet is also too large.

My second attempt was a lot more promising and took a lot less work to get a solid foundation. I extracted Vader's head and used it as a base for the mask. I made heavy use of the polish tool while holding alt, which flattens edges while also pulling them out instead of crushing them down (the default behaviour). For the move, I just dragged out the lip area with the move tool before smoothing it down.

I started refining the shape now; I used dam standard to sharpen the edges around the brow and against the nose ridge. After a little more surface polish, I masked the breather intake, poly grouped it, extruded inward and used the deformation to sharpen the edges. The result is looking quite good now, it sells the shape fine, but I'm planning to go the whole way with it, so I'm planning on modelling the mesh grills, and the finer surface details of his mask.


I used Maya to create the mesh grill, it just appeared more straight forward -- Zmodeller is not a bad tool, but it feels less versatile in terms of box-modelling which is more dedicated to that style of modelling.
In Maya, I selected all the faces, hit poke, which made intersecting, diagonal lines across the grid. From there I selected the faces I no longer needed and I deleted them to make the holes. Lastly, I extruded the faces for thickness.


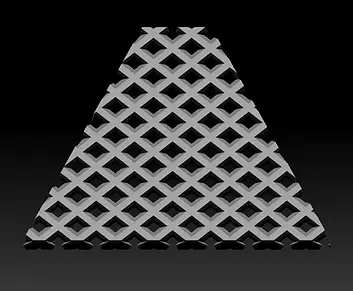
One last step for the grill I have finished back in Zbrush. The mesh didn't fit the triangle-shaped hole of the air intake, so I quickly used the knife curve tool to slice off the corners to make it fit. I had to do this twice, as I also modelled a second intake. For the second hole, I used a boolean to sharply cut the hole away.
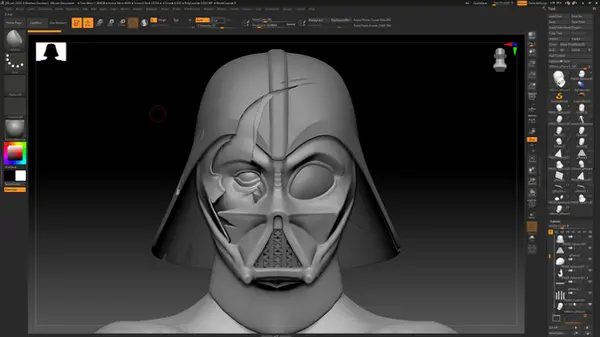


The final step of the helmet was the deep gash around the right eye. I have taken this reference I have had since the start of the project, it's what inspired my character design regarding how I drew the helmet. The process involves heavy, frequently use of the Knife Curve tool. To cut down the number of operations, I found that hitting ALT causes the curve to begin to curve, and hitting it twice makes the curve sharp instead.
Frustratingly, because I used this tool, and on such a high-resolution mesh it caused Zbrush to crash numerous times to during this exact step of the process. I had to redo my work on these slices at least 3 times over, so I had to save more aggressively when using Knife Curve specifically. In future, I need to be a little more cautious approaching this tool, it's easily the most unstable tool I used. For reference, the application only crashed about twice across the entire project before I started using this.

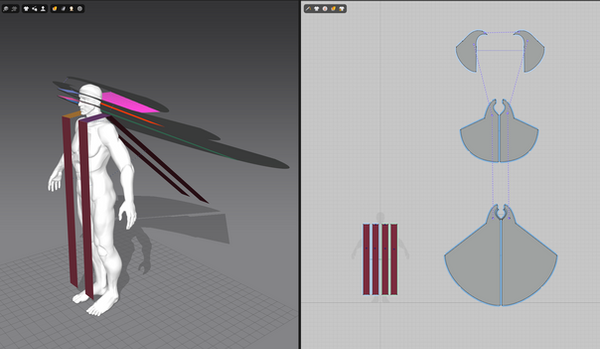

dark-grey material

Red material
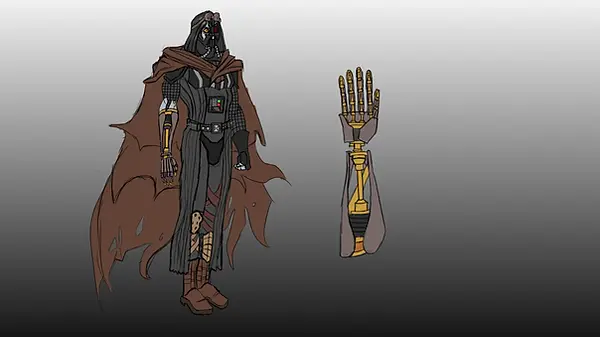
My cape in my concept appears deceptively simple, but if you look at the cuts in the cape you can see its composed of 3 layers. I didn't put much thought into layering at the time, but I thought it would ne cool if I tried to stick to the concept faithfully and create 3 different layers stacked on top of each other.
I opened Marvellous Designer to work on the fabric materials, as my ability to sculpt folds is somewhat limited. Furthermore, I think it's common for most character artists relying on some degree of simulation for gigantic articles of clothing like capes -- there's just too many intricate folds and shapes to mimic by hand in 3D.
For the clothing and the shapes used rectangles for the drapes. I set its material to bunch up and fold like silk since I wanted some interesting folds while, but their placement makes it difficult for them to bunch up much. To mimic a belt holding it down along the waist, I added tacks on the avatar around the waist, which will make the nice folds I'm looking for.
For the capes, I turned the values up, stretch-weft, stretch-warp, bend weft and warp, and the result is that the material less like satin/silk like the first material, and it makes the folds more broad and sweeping compared to pinching, noisy folds. It makes the folds more rigid and less noisy, which makes it less overwhelming since it wont ripple unnaturally.


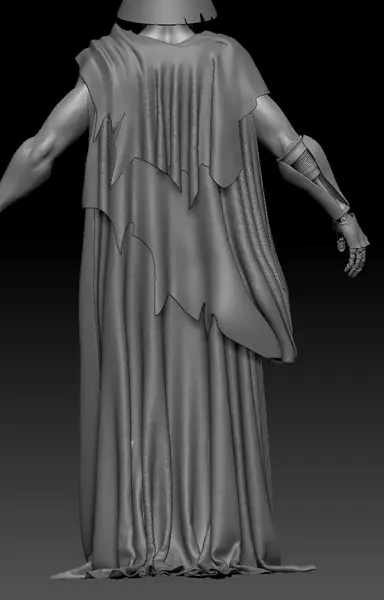
After tweaking with simulation settings enough, I finished with this result. I feel like the folds along the front are a little disappointing, it's all a bit flat, however the back folds really nicely -- large billowing folds that doesn't push into being overly noisy. What I have decided, after tweaking and continually re-simulating the fabric for over 2 hours, I decided it would be faster if I sculpt a few key folds around the front back in Zbrush when I have the time. Especially considering the back profile looks good.
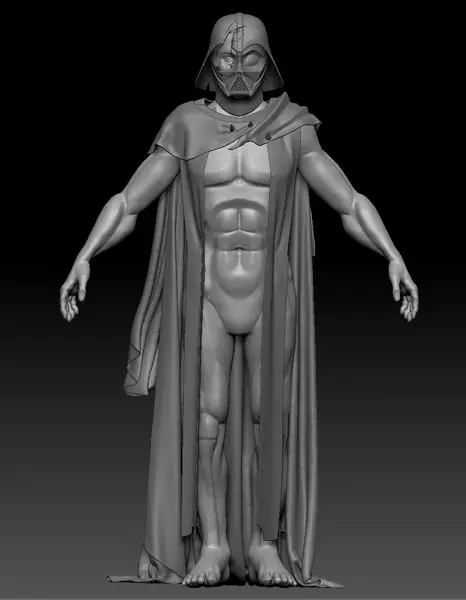
In Zbrush, I imported the models, I gave them thickness with Zmodeler, before adding little spikes to act like pins that hold the fabric to Vader's armour. After, I sculpted a couple folds around the left shoulder, making it pinch more around that area, whereas on the other side I exaggerate the flow slightly, pulling it out and pushing to make it less flat.
I wanted the result to look tattered, so I took the knife curve tool to cut away at the edges of the first two cape layers. I felt that these sweeping diagonal slashes were quite dramatic and tattered compared to more orderly, flat edges.
I feel like the result is quite strong. Although at the moment it dominates the design too much. Before I cut back on the design or pull it in, I think I'm going so sit on it, check what it would look like with other elements of the design first before I make any more changes.


I Swapped over to Maya to start work on modelling the arm. The simpler, cylindrical/boxy shapes are far quicker to model in the application. From dragging models around, to performing bevel, extrude, scaling operations are just a bit more precise. So the central shaft of Anakin's arm was an obvious choice for this workflow. The bottom cylinder formed its shape with a mixture of extruded edges for the bottom of the shaft, where a large row of edgeloops were pulled inward to give it that smooth, ridged shape.
The most complex elements were at the top of the model (the rectangle is forming the start of the palm). The difficulty came in making the curved semicircle shapes that join together at the pivot. To make the topology clean, I quad-drawn over the edges to make the shape even and to follow the edge flow better. It would have been far easier to just game a bunch of primitives together, but I thought making it one joined shape would make the lighting smoother.
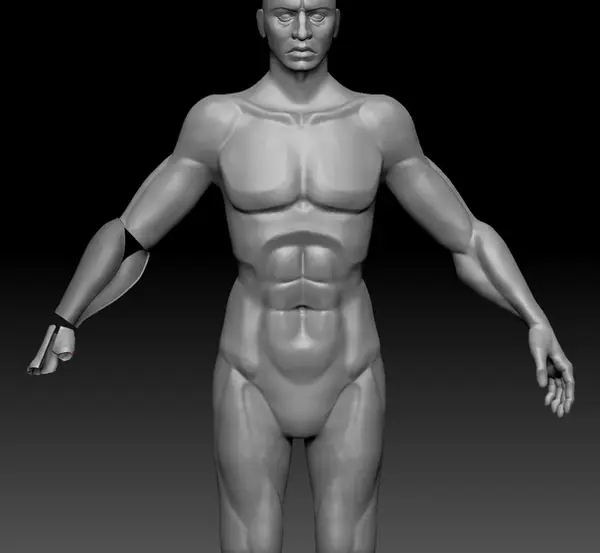
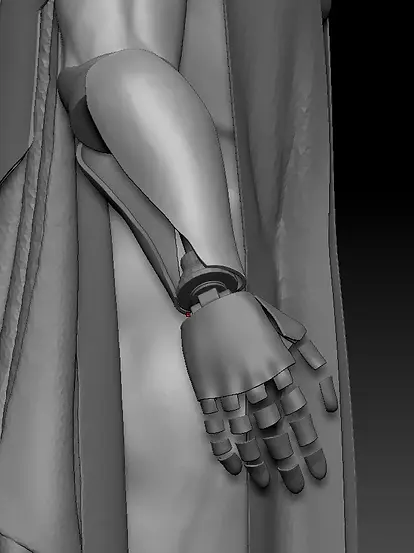
Back to Zbrush again, I imported this shaft into the scene and put the model where the arm is supposed to be. Meanwhile, I extracted the forearms and elements of the right hand and I extruded to give them thickness to them into shells which will hold the form and structure of the machine arm.
These shells are a fascinating element to me. As I composed it from the base of the arm, it will keep the arm's rough silhouette, making it immediately readable as an appendage with the curved, shapely surfaces. But it's when you focus on it is when you notice it's deeply inhuman -- intricate, machined metal maintaining the synthetic form, seams and robotic joints everywhere on the inside. In terms of character design, I think it's so striking because it's hollow; it's lightweight, but the machinery makes it feel strong and purpose-built to be somewhat agile despite its heavy construction, which can imply it's used for dexterous activities such as combat.


One more time for this piece, I dragged it back to Maya. Now all the components were brought together, I just had to make the finger joints. I thought Maya was better for this step, since it proved to be really finicky. Manually dragging the joints around took a long time, and moreover the fingers connecting between the joints needed a lot of vertex editing in practice since nothing lined up as smoothly as I hoped it would, so it involved a lot of dragging, rotation, etc. That kind of stuff I would describe as tedious in Zbrush's interface.
One more time for this piece, I dragged it back to Maya. Now all the components were brought together, I just had to make the finger joints. I thought Maya was better for this step, since it proved to be really finicky. Manually dragging the joints around took a long time, and moreover the fingers connecting between the joints needed a lot of vertex editing in practice since nothing lined up as smoothly as I hoped it would, so it involved a lot of dragging, rotation, etc. That kind of stuff I would describe as tedious in Zbrush's interface.


At this point I decided the cape was too long. At first I followed a reference for Vaders cape-span, and how its absolutely massive, but looking at myresult, I don't like how it interferes with readability. So I decided the third layer of the cape was shortened down at the bottom, cut up to look tattered like the other two. In hindsight the shorter cape is more practical, it shouldnt drag on desert sand or weight Vader down as much while still providing ample protection from the sun. Not to mention if its that long it would probably be the first part of the fabric to tear from how much it drags. The result now left me quite pleased, it makes the legs more readible which I felt the model desperately needed after I added the cumbersome fabric.


This part of the process was my favourite: getting started on the armour and the tight-fitting clothes. I like the mix of organic shapes and hard edges that composes armour, it gives me room to experiment with the rough underlying structure, some manual polish and sculpting, as with as some refinement with using the deformation panel. This workflow tests multiple facets of my abilities while avoiding being overly tedious like the manual work of truly hard surface box-modelling or overusing Zmodeler. It's artistic expression and technical skill both at once.
My first focus was on the chest plate; to make it feel more like armour, I drew two sharp horizontal lines that accentuate the pectorals. I did the same process for the clavicles, although more softly. I found that gave me a good foundation, at which point I turned off perspective, used rectangle masking to draw vertical stripes over the model. After making them polygroups with CTRL + W I used zmodeller to briefly extrude those edges. Last of all, I played around with the deformation table to soften up the edges of the stripes and the harder edges.

Comparing my design with my references, I found that the shoulder Pauldrons on Vader's outfit are quite wide and more pronounced than I had remembered off by memory. I chose to stretch mine out a little horizontally on that realization, which has the nice effect of breaking up the silhouette. It makes him appear to have broader shoulders, almost making him appear more bulky and threatening.
To polish up the model, I used Zremesher to make the topology cleaner for better shading. As for the trim around the mesh, I used the Curve Tube l brush. If you simply hold SHIFT while hovering your cursor around the edge of the model, it will automatically follow the shape of your edges.

I decided at this point in the process I was going to turn the base figure into armour. Since the base figure was already sharp, to me the detail almost read like form-fitting armour already, so I thought it would save me a lot of time if I'm not adding a bunch of extractions and layers of clothing if the base serves the same purpose with a bit of retooling. Reducing layers is also helpful in making retopology easier later down in the pipeline since quad draw wouldn't have to face with sticking to the wrong layer of geometry (which is extremely tedious to work around, requiring per-vertex manipulation oftentimes).

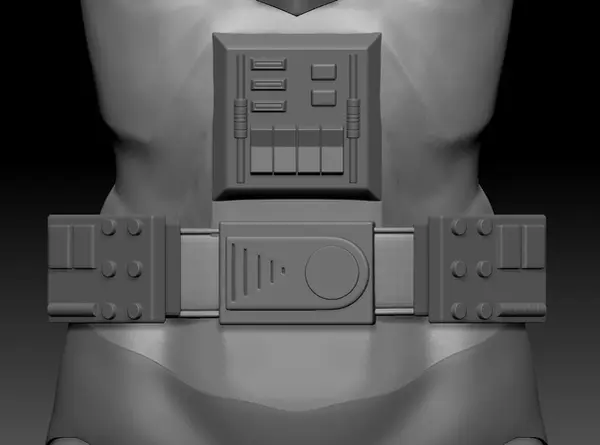
For the belts and buttons, I primarily modelled all the intricate components in Maya. These components could easily be achieved by using either program, but I choose Maya for personal preference, I'm more comfortable using it, and I'm more familiar and faster with the modelling interface compared to Zbrush's cramped Zmodeller menu, fast enough to justify the jump for me.
Most of the shapes are just polygon primitives. I use a lot of bevelling and extrusion -- nothing fancy.
As for the belt, I used the curve strap brush, and using zmodeller I extruded edges near the top and bottom to create a stitching seam along the edge.

Like how I modelled the belt I added various straps using the curve strap tool, using zmodeller to bevel the edges and make little seams to break up these elements as different fabrics. I thought some material variety was inherently a bit more interesting than a bunch of identical straps.
The knee braces I made using zmodeller and masking with the move tool. The shape began as a rectangle until I shaved off the edges and pushed the centre forward to give them that curvature. For their groves, I masked off a handful of edgeloops and extruded them inward.

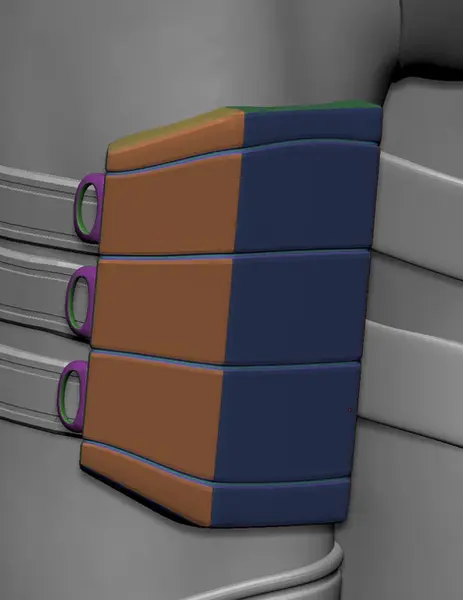

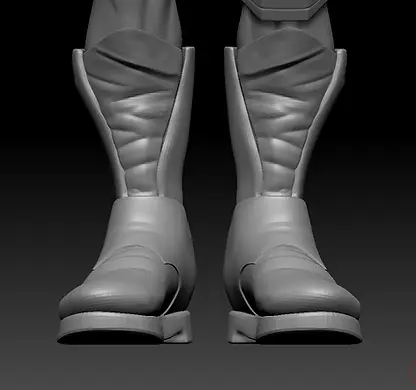
The boots were made with a compounding process. The main shape I extracted from the feet, that I proceeded to smooth out and fit around the feet. I feel like modelling the toes from earlier is helpful here, since I have a good spacial awareness of whre the toes are supposed to be resting inside the boots, so I made them taper a quite thin up until the toes. In older projects I would make the shoe size quite thick around the toe to be broadly accomodating since I wasnt entirely sure how theyre supposed to rest, but I feel its clear to me here. After I have the main shape, I extracted two subsequent shapes from the shoe, and using the knife curve tool I diced up the purple sole to fit the curvature of the foot better, where I make the second layer on top of the main shoe I used the knife tool again to get the nice, rounded curve around the front and side. After that it was a matter of polishing the sliced edges, remeshing them, and then sculpting rough folds into the chunky leather material.
The tongue of the boot I made by extracting a mesh from the legs before sculpting on curvature based off the folds I expect from the shape being bound from laces.

I forgot to document the process myself, but when I was making the laces for my boot, I used curves in Maya -- clicking and creating points before dragging them around with soft select to create the laces. My savefile is lacking the curve itself for some reason. As to how I transformed the curve to a mesh, look to the tutorial's timestamp at 0:48 at how I used a sweep mesh. As the tutorial shows, I pressed the sweep mesh button and got mesh immediately, but what makes the method special is that you can tweak the mesh after-the-fact when its already applied to the curve. I tweaked the amount of edgeloops, edgerings until I got the result.
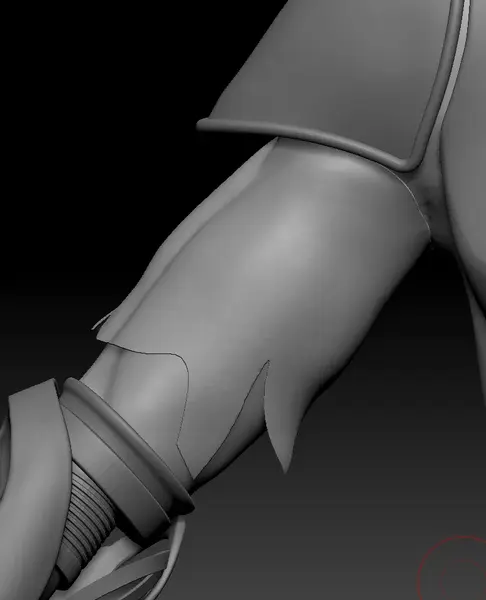
Last detail I needed before making the finalizing touches was tearing up the right sleeve. Now, I didnt have sleeves or a top to work with, so I simply extracted one quickly just around the arms. There is a seam along the top of the arm now, but I opted to not do anything about it considering it was a natural place for a clothing seam, so I left it. To tear it up, I used the knife cut tool to cut shapes where te sleeve would have been ripped to expose his arm. I think this part looks a bit simplistic looking at it on its own, but later I am intending to add texture to the fabric during the texturing process to save some time. Considering the sleeves should look like a padded leather, modelling that effect is a bit beyond me unless I were to try more simulated workflows. That said, my limited experience in Marvellous Designer would set me back a huge deal of time that I can't spare.


I came out really pleased with the result I got at the end. The sliced effect of the mask works really well for me -- I was really careful the deep cuts and the crack followed a certain trajectory, as if he was struck with an upward slash of a saber. The exposed eye works really great here, it conveys his humanity behind his intimidating image, placed in a vulnerable position.
The arm came out extremely clean, better than I had hoped for - it looks both practical but quite elegant too from the prestine edges and curves of its outer shells, with just a hint of the machinary behind it.
Surprising to me was how naturally the boots intergrated with the design; with all the other apocalypse-style apparel it doesnt jut out or clash with the clean armour or anything. I think its been one of my most technically and artistically proficient sculpts Ive done to date, a great measure of my improvement.
Only thing that juts out to me is the left glove, I ran out of time doing anything more than an extraction and roughly pulling it into shape. If I had more time I just wish I could have sculpted some folds onto them.