UE Sequencer, filming, editing and export.


For the composition of my first shot, I wanted a turntable. The methodology is simple once I figured it out, but it took a bit of trial and error.
Initially, I added an empty actor named "Turntable", moved it to the subject's centre, and offset the cine-camera I created, so I had the subject in centre frame. To make sure the camera was facing straight forward on the subject, I used the transform menu rather than the gizmo for alignment. I made a 10° rotation in the pitch, which I believe gives the best framing - nothing skewed but slightly more interesting perspective than 0°.
For rotation, I parented the camera to the turntable actor, but this didn't work given the temporary nature of the cine-camera. The method worked... up until I saved the sequence, at which point the camera unparented itself and broke the cinematic, which is repeatable behaviour. So, after with some troubleshooting I found that hitting the "+" tracking icon on the cine-camera in the sequencer I could use "attach", which gives the same behaviour as parenting without breaking in this instanced level sequence. As for how I made it rotate, I spun the empty actor 180°, added a keyframe in the middle, and spun it back around 180° on the last frame, which gave a continuous, fluid motion at a consistent length away from the figure. Now I wasn't quite finished, I had to change the keyframes (pictured on the left), and make them continuous so they don't accelerate or decelerate.

These are the camera settings I opted for, which I generally kept the same for all my shots. The main thing to change was the focus, given I took shots at difference depths etc -- I used manual focus over the tracking option since I found automatic tracking follows the pivot of the model, and it's not something you can finetune that well.

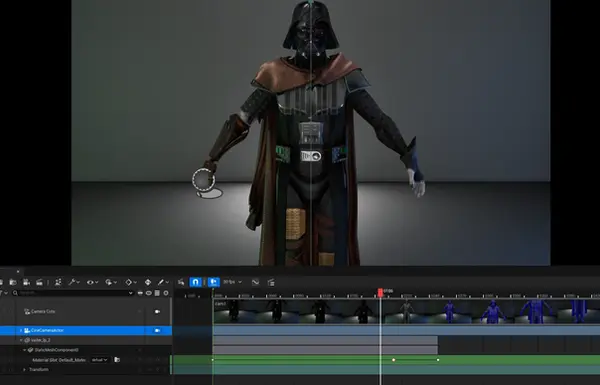
Shot 2 would prove to be my most complex shot - and for compounding reasons. Starting off simple was the material switcher; upon adding the Vader model as a trackable object in the sequencer, hitting the plus option gives the option to add the material switcher that you can keyframe material changes (and without adding multiple texture tracks to the actual model which is a plus). After adding it I just had to select from the dropdown the chosen material and then keyframe when I swap to the next one. Secondly the next easy part was setting up the motion of the first camera, I mostly just had to drag it around and its keyframe it which I used the gizmo for - also being careful to keep the rotation values consistent to keep it clean.

Where the second shot begins to get difficult is my intention for a multi-camera or splitscreen setup. My intention is to show the figure from the front and back in the same shot for my wireframe. My reasoning is that I want as much of the figure visible as possible - and I already had done a turntable camera, so repeating that would be dull visually, so this was my conclusion.
The idea to go about doing this was to film the two cameras in separate sequences, and somehow figure out how to stitch them together after-the-fact.

The second shot I had just duplicated the first on, but with some key differences - I had the yaw rotation flipped 180°, and I took the translation X value of the first camera and I turned it negative, meaning that: the distance from the centre was the same, the angle is reversed, while all other transformations remained the same.
There is one more tweak to the composition: I took the last two camera transformation keyframes (depicted on the left), and I swapped their positions. What does this mean in this context? Well, it means the final pan of this shot is reversed (perfectly). So instead of the camera pans down, it pans up. The Start and endpoints are the same between shots are perfectly mirrored, except they're flipped. When I stitch this together, the shot from the back would pan up, and the front shot would pan down. I thought this was more dynamic, but since it's mirrored, it's visually cohesive too - not just some random shots stitched together.
I found this interesting material to create exactly what I needed to create the splitscreen in engine via this YT tutorial. You may be asking why I wanted it in engine; my reasoning is that it's dynamic -- I could change the framing of the character, control the colour correction via the post-processing volume, etc. Plus, I thought it was an interesting challenge.

How the material works: I have two "SceneCaptureComponent2D" cameras which converts their input into a 2D texture - this basically turns them into real-time TV screen shaders. To make them follow the cameras, I turned the temporary cine-cameras into permanent game actors, and then I appended the Scene Captures to the cameras as components (simply parenting them plainly doesn't work, this took ages to troubleshoot). Now, these Scene Captures are recording what the main Cameras see as they animate and turn them into textures.
Using these textures, I plug them into a material. The Tex Coordinates and the constant 2 vectors are plugged into a multiply nodes, which is put into the UV coordinate channel of the texture. Multiplying the V channel by 2 means that the Y axis will be duplicated by 2 and squashed into the 1-1 space. Do this for both textures, you get 2 halves you can use for either side of the screen.
The last step is basically masking -- The if statement masks off the right side of texture one, as well as the left side of texture two, meaning they're no longer over lapping and then can be plugged into emissive colour (it's an unlit material so it basically replaces the albedo).

Putting the material on a 16x9 rectangle produces this result.
The result works!... except... the Screen Captures don't appear perfect. As you can see the exposure is wrong, the colours aren't quite right, and my troubleshooting could not fix it. I tried changing the scene captures HDR colour capture settings, the resolution, colour space - etc. And yes, it is in the post-processing volume. I just could not make it match my camera no matter what I tried.
I ended up abandoning this experiment after hours of set-up, I had to go about this with via different means.

I'm just going to summarize shots 3 and 4 since they use the same techniques as previously discussed. 3 Is a panning shot towards the head with a slight pitch angle shift, whereas 4 is another turntable, except it's a close up on the metal arm. These close up shots were made since I wanted to put special focus on these elements, as they're particular pieces I'm extremely proud of and want the audience to get a good look at.


After my failed experiment to make the splitscreen shot work in Unreal, I decided I would switch up my approach - that being making everything from scratch in the engine - to something more conventional with more versatile programs. I was going to render out my sequences individually, edit them in a video editor program, and then render that out as one final, finished video.
As for rendering out from Unreal, I decided to render PNG image sequences, which I would then use an encoder to stitch all the frames together. As to why I chose this, I found Unreal's video export options extremely chaotic and even antiquated - the default .MOV is literally broken. In my workflow I used the FFMPEG encoder since the program is lightweight and highly configurable. The cost of its freedom is the lack of a GUI, requiring a little use of Windows CMD terminal. I had to CD to right drive and then the path of the frames. Then, with the following CMDs:
"C:\Users\[Redacted]\Documents\ffmpeg-7.1.1-full_build\bin\ffmpeg.exe" -framerate 30 -i shot_1_turntable.%04d.png -c:v libx264 -preset slow -crf 16 -pix_fmt yuv420p -movflags +faststart shot_1_turntable.mp4
CRF is the main compression level, YUV420P is colour compression that makes it widely compatible for services like YouTube. After that I have my video sequence which I did for the subsequent 4 shots.

After my failed experiment to make the splitscreen shot work in Unreal, I decided I would switch up my approach to something more conventional. I was going to render out my sequences individually, edit them in a video editor program, and then render that out as one final, finished video.
As for rendering out from Unreal, I decided to render PNG image sequences, which I would then use an encoder to stitch all the frames together. As to why I chose this, I found Unreal's video export options extremely chaotic and even antiquated - the default .MOV is literally broken. In my workflow I used the FFMPEG encoder since the program is lightweight and highly configurable. The cost of its freedom is the lack of a GUI, requiring a little use of Windows CMD terminal. I had to CD to right drive and then the path of the frames. Then, with the following CMDs:
"C:\Users\[Redacted]\Documents\ffmpeg-7.1.1-full_build\bin\ffmpeg.exe" -framerate 30 -i shot_1_turntable.%04d.png -c:v libx264 -preset slow -crf 16 -pix_fmt yuv420p -movflags +faststart shot_1_turntable.mp4
CRF is the main compression level, YUV420P is colour compression that makes it widely compatible for services like YouTube. After that I have my video sequence which I did for the subsequent 4 shots.

Now the segments are rendered, I chose Divinci Resolve as my editor of choice - it's powerful and free.
I finally got the opportunity to render my splitscreen segment I was planning hours and hours before. All I had to do was add a second video channel, line up the clips vertically, and then offset the two so they didn't intersect. I also added a dividing line to make it fancier, which was just a rectangle shape. As for the other clips, it was only a matter of dragging them in the timeline.
The cinematic was good so far, but for a professional showcase I realized I had to show the textures and UVs in addition to everything else, so I tacked on another segment at the end. I would rather forgo multiple renders for the finished product and just pack it into one continuous video, which minimizes the need to look around to scroll for details.
To make my UV/texture showcase at the end, I decided I wanted a render for the sake of shot continuity - UVs without context (the subject) were slightly jarring upon playback. I used the sequencer the same way I would render video, albeit I limit it to rendering just a frame which I would then import as an image.

I added the frame to a dedicated timeline to use Divinci's image compositing workflow. The method was not ideal: I needed a dozen video render tracks layered to place my image and my various textures, and then on top of that it was hard getting alignment right considering I can't drag multiple images together (unless I wanted to rasterize them into a single layer), so spacing was harder than Photoshop for instance. Now, I would have used that application if only I had access to it at the time. The reason I had a second timeline is that I could just crop and adjust the length of the whole timeline instead of dragging every image up or down individually.
Adding various elements like text, coloured backgrounds were easy. I wanted gradients and more effects added, but surprisingly those effects were hard to achieve unless I wanted to resort to external applications. Overall, I thought it appeared fine, so I left it with time constraints in mind.


Back on the master timeline, the last thing I noticed upon watching the playback was how sudden the transition between the animated video transitions to the UV and textures were still jarring even with the render on the left. I found this interesting as I felt all the other shots didn't require transitions to flow well. I needed some kind of effect to smooth it over, and in light of that realization I used a screen wipe - since I was inspired from the movies. The effect was easy - right under toolbox > video transitions. To put it where I wanted I had to right-click the start or the end of a clip, add the effect and then specify the transition length under the inspector.
Now on playback, no cuts come off as jarring.

With all the edits complete came the final export - I couldn't express how proud I was to make the project to the end!
I was researching out the best render preset to use. Unlike FFMPEG, where I could force the MP4 to render at a particular CRF quality, the presets were nebulous. What I found worked best was setting the bitrate manually. I set the figure to 40k KB/s for the most visually lossless method without making the file size astronomical. That's 4MB/s for reference, or theoretically 120MB for my 30 seconds of footage. The actual file size came down to 60MB, or 2MB/s, so perhaps I rendered my source clips at too low of a bitrate. Still, I thought the result was good enough where it wasn't worth the trouble to re-render the source files.

The last step was publication of the render. I took my final output and just plugged it into YouTube and added a thumbnail, title and relevant metadata, then uploaded the work. And done!
Retrospective/Conclusion.
Despite the tribulations I faced creating this model, I finished with a piece that is my best work to date artistically speaking. While I expressed disappointment with the optimization of the model requiring 3 UDIMs, the complexity of the model does somewhat justify it. In hindsight, were I to face real engine constraints, I could have made a 500px tiling texture for the cape and forego the baking detail (or try to shove that somewhere into another UDIM), but that would degrade the visuals even if repeating the texture preserves the texel count roughly the same. On the other hand, I consider this fault of the project to be somewhat of a silver lining - considering this was my first real use of UDIM workflow in my creation process, I learned how to set up those textures in Unreal and Substance Painter, how to mask fill layers by UDIM tile so I could create my wireframe texture.
I got the model to 50k triangles, which is acceptable, but I could have used a couple edgeloops around the figure's arms as there isn't enough geometry for deformation, which is why I opted to not rig it at the last minute. The cape could have had more consistent geometry density... but honestly, I was really over my head trying to optimize it with brute force retopology. In hindsight, I saw Marvellous had retopology options, I should have done my research and I lost days of time trying to optimize this particular element. On the bright side, I find the cape to be a highlight of the design, I enjoyed making its ragged textures, and its colour scheme does make Vader appear more like a desert dweller survivor rather than a guy who just lost a random scuffle, and I think the fact it contrasts so much with his regular armour is what makes his outfit feel make-shift and desperate.
About the artistic element, I do feel there also is room for improvement. I completely forewent elements like the goggles in my concept, which is ultimately an issue of my time management and my scope. Other aspects could have been done better. My largest regret was not taking time to refine Vader's mask; if you look up close without any textures, the model is slightly lumpy, and not in a way that appears intentional. I believe if I worked at a lower resolution and used layers for refine details I could have ended up with a considerably sharper model, but I used Dynamesh/Sculptris Pro and sometimes Zremesher which tends to be fine for my workflow, but in the matter of hard surface, the lack of subdivisions makes refinement difficult. There was also the gloves - I wanted to sculpt folds, but I rushed that element the most in favour of more prominent elements. And with the lack of fabric detail in the texturing, it does compound it as more amateur than the rest of the model.
Making large gloves like that fingerless just doesn't look good stylistically, it's two styles of glove that don't work well together. About the positives, I damage on the helmet, that deep gash around the eye is super dramatic - Anakin's withered, angered gaze shows his ruthlessness and determination to survive. I also like the exposed robotic arm; to me, it represents Anakin's loss of humanity in his pursuit of galactic conquest, and in this context it doubles down on his determination to survive as he's reduced to possessing little more than the clothes on his back and the machinery keeping him alive. Now, if I had more time and reflection, I would have geared him with a hip flask which would add context that water is not abundant in the fantasy setting I put him in, but I certainly believe it works as is. Overall, what I'm most proud of is my texturing, particularly the contrast of materials. Nothing blends together - you can take any piece and guess what the elements are supposed to resemble - like the ragged cloth of the cape, the arm's painted metal, the boot's leather, the metallic sheen of the armour and glossiness of the helmet. I think material delineation has been very effective.
About project management - I struggled most balancing my time. During the early months, I barely did any work beyond the concept art, and then pushing into December, I dropped all my assignments to tunnel vision my focus on this assignment. My issue was attendance, managing my anxiety to attend my lessons made me too scared to attend lessons and so it gave me more excuse to work my projects one at a time rather than juggling the three assignments I had. I seriously need to work on my ability to juggle more than 2 tasks at a time, it was my biggest weakness of the project. Since my project was loaded all towards the end, I had little time to course correct and receive crucial feedback.
In the end, the project is something I'm proud of, but I hope I can keep the technical and timekeeping lessons in mind for my future work. Some of this I couldn't have learned without doing it myself, but I also shouldn't have isolated and boxed myself in like I had, because I certainly learn more around peers and teachers.