Lighting and Material Setup.
I decided to use Unreal as my renderer. My reasoning for this is that it's what I usually do, so it's the most frictionless for me besides using Unity. I have limited experience in Marmoset Toolbag, but more on that, Marmoset technically isn't a game engine. It renders in real time certainly, however it's just something consumers would never interface with, so I would rather develop my knowledge in Unreal which gamers do directly interface with in games. Moreover, I also lack a personal licence, which would also limit how much I could use the software pushing into December as I go home for the holidays. As someone who makes use of their ILP extension, I usually work into a good portion of the holidays.

The first part of set up was the main material. I set the masks texture compression settings to masks, and then plugged it into roughness, metallic, AO. Normal and Albedo didn't require compression changes.
I used my anisotropy map from the albedo alpha and plugged it into the correlating channel - and I found it honestly made no visual difference to my surprise; maybe I needed anisotropy angle channel to actually make a discernible difference, but with the earlier tweaking in Substance Painter, that renderer didn't show any changes either so it was hard to tell what I was actually doing besides masking. In future, I need to look at more tutorials to find out how to achieve that brushed metal look.
I also added a normal flatness node so I could either intensify or soften the normal map. My rational at the time is that my scene looked really soft before I set up the lights, so I tried boosting the normal map for clarity, which I ultimately decided against after the rest of the set-up.

Lighting and basic set up was something that took forever, but I am going to truncate the troubleshooting into a summary. I used shapes in the Unreal editor, so I didn't need to go back to Maya to make a model for a background - basically for the sake of brevity. I opted for a darker floor compared to the walls since it gave a stronger impression of ambient lighting; since the overhead light was the main source, and it was projected from the top of the mini environment. It was almost like faking or accentuating ambient lighting shadows
So the goal of the lighting was an indoor setting. In past projects I used to use a directional light without shadow casting, in addition to Exponential Height Fog, Sky Atmosphere, Volumetric Clouds, and stuff like that to light indoor scenes. And while this worked in conjunction with some indoor lighting, I thought I would use a different, more realistic configuration for an indoor scene. Setting up the lights was simple enough, but the main thing was trying to judge just how bright each light should be to light up the subject. I found that making the secondary lights (the ones on the floor) too dark made the subject overly lit by basically ambient occlusion, and it made my normal map extremely hard to read. To resolve this, I adjusted the intensity of my normal map as I formerly mentioned, but what I found actually working better was dimming the primary light from 75 CD down to 50 which brought it in the same level as the secondary lights. What I found by doing this is that the AO and the Normal details were no longer drowned out. The main lights that solved it were the coloured lights, and not because they were coloured, but the angle of the light caught the contours of the model nicely, accentuating them.
I did actually reduce the brightness of the lights in front of and behind the subject to 25 CD, basically making them subtle, since at higher values they also blew out the normal details, but at this lower intensity it ensured every facet of the model wasn't in shadow which is key for my goal since I want to ensure visual clarity over, say, dramatic lighting.
The last part of the general scene set up was using a post-processing volume. I used the volume to clamp auto exposure factors, which is critical for scene consistency. I also tweaked exposure, raised the quality of lumen global illumination, shadow quality, etc. I faced an issue where scenes like mine that are indoors required a far greater Lumen settings. Other than that, I keep the volume settings vanilla.

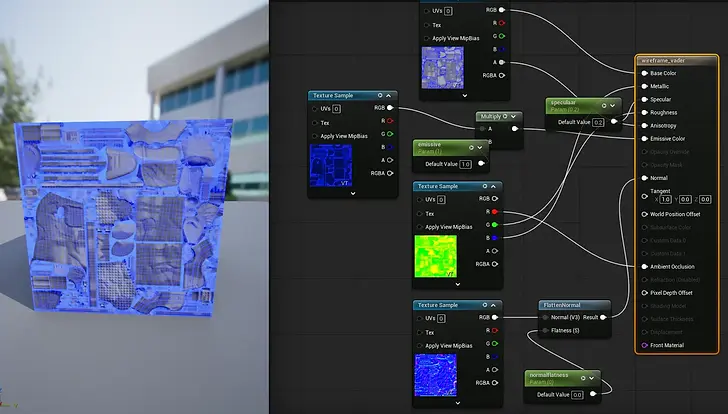
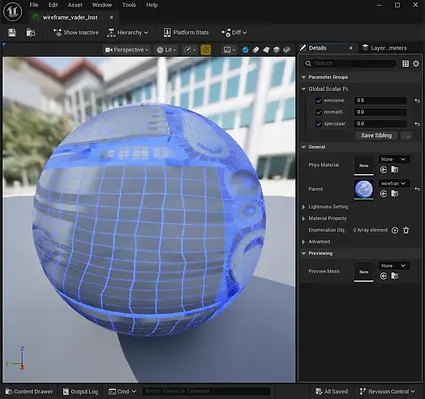
One last for set up; I've been plannning for the AO and wireframe shots so I exported those from Substance painter and plugged them into their own materials, just like the main Vader material. I did make a small change, I was added a brightness slider for the wireframe emissive so I could adjust its exposure values on the material.
Now the materials are made, the scenes are set up, I just had to convert these materials to material instances, and then I could begin making my video sequences. In my material instance for the Wireframe material, I decided 0.5 brightness (or half) made sure the brightness didn't blow out the soft lighting of my scene.